
|
QSO Entry Fields |

The small triangle on the right of this section opens and closes the qrz.com, qrzcq.com, and HamQTH.com query side panel.

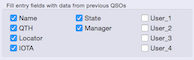
Data take over from previous QSOs
Date and Time
To log the QSOs in real time, activate the Real Time option.
If the option Real Time is not checked, the background of the date and time fields changes to orange. This is a reminder for you to check the time to prevent mistakes.
Callsign
The Callsign field is also used for trx control! Enter a frequency in kHz into the callsign field, followed by Enter, to tune the transceiver. The corresponding mode will be selected according to Preferences–>QRGs.
While you type in a callsign, the DXCC will be calculated and the DXCC Info Box shows the results.
The Station Info Box will be filled when you tab out this field. If you want to see previous QSOs with this station, the toggle option Menu–>Logbook–>Show prev. QSOs must be activated.
After entering a call sign, other fields can be filled with data from HamQTH.com, qrz.com, qrzcq.com, or from data from previous QSOs. The color of the field shows where the data came from:
- blue for data from your own log
- brown for data from an online service
Frequency
It shows the actual used frequency in kHz. Entering another frequency in this field does not tune your radio! See above how to use the Callsign field to tune it. The background appears in red when the frequency is outside the boundaries defined in Preferences–>QRGs.
Mode
When you have an active CAT connection, the value of this field comes from the transceiver. This functionality can be switched off using the check box below Follow TRX. To manually select a mode use the popup menu. The available modes can be selected in Preferences–>Modes
Following shortcuts are available:
- C –> CW
- S –> SSB
- R –> RTTY
- P –> PSK31
- F –> FM
It is not possible to enter the mode as text, please use the above shortcuts!
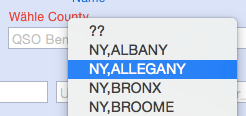
State
Enter the “Primary Administrative Subdivision”:
- USA –> State
- Canada –> Provence
- Germany –> DOK
- Russia –> RDA
For USA, the popup menu shows states. As soon you have selected a state, you can select a county from a contextual menu above the Note field.
Locator
The color of the text has the following meanings:
- Black: manual entry
- Blue: data came from your own log
- Brown: data came from an online service
You can see the QSL status per band below the input fields.
IOTA
The IOTA Reference number must be entered in the correct sequence: CC-NNN
- CC –> Two uppercase letters for the continent (EU, AS, NA, SA, OC, AN, AF)
- NNN –> Three-digit number (001 - 999)
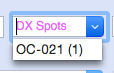
The number in the parentheses indicates the number of spots with this result. This may help you to find the correct value.
The color of the text has the following meanings:
- Magenta: selected from the popup menu
- Black: manual entry
- Blue: data came from your own log
- Brown: data came from an online service
You can see the QSL status independent of the band and mode below the input fields.
Manager
It is used for the QSL manager callsign, which will be printed on the QSL cards. The popup menu will be used in the same way as the IOTA field.
QSL
A single character will be used to indicate the status of incoming and outgoing paper QSL cards:
- – –> Ignore: Do not send a card, card not received
- W –> Worked: Queued for printing, card not received
- R –> Received: QSL card received, queued for printing
- S –> Sent: Card printed, card not received
- X –> Exchanged: QSL printed, QSL received
- Q –> Requested: Card not received, but was requested (OQRS), do not send a card
- G –> Got: Card received, do not send a card
- B –> Back: Sent card came back
- N –> Not in Log: Sent card came back
LoTW
A single character will be used to indicate the status of incoming and outgoing LoTW QSLs:
- W –> Worked: Queued for upload, QSL not received
- S –> Sent: QSO uploaded, QSL not received
- X –> Exchanged: QSO uploaded, QSL received
eQSL
A single character will be used to indicate the status of incoming and outgoing eQSLs:
- W –> Worked: Queued for upload, QSL not received
- S –> Sent: QSO uploaded, QSL not received
- R –> Received: QSL received, queued for upload
- X –> Exchanged: QSO uploaded, QSL received
CQ and ITU
The suggested zone may be incorrect if there are multiple zones for a given country.
Power
Enter the tx power in Watt, or use a fixed value from the popup menu.
QSO Note
Whatever you want. The entered text can be added to the eQSL card: Preferences–>LoTW/eQSL
County Popup Menu
User-defined Fields
Four database fields are definable by the user in Preferences–>General. For each field you can:
- assign an identifier, shown in the logbook table headers and below the logging fields.
- set an option for ADIF import and export.
- choose a Remember option. When selected, the contents of the field will not be cleared. You can log multiple QSOs with the same text (IOTA, SOTA, or /P operation).